Building a Tree Grid using GXT / GWT
There is a large debate among GWT developpers on whether to use native GWT for applications and do everything from scratch or to make use of the large set of ready to use components and widgets provided by GXT. Personally, I prefer GWT as I do not like to be tied to any particular way of styling components. Based on my experience, GXT provide a great set of widgets that proved to be extremely useful; however, customizing them can be very time consuming. GXT components’ performance is inferior to native GWT components. That being said, we can not deny that GXT can help developpers save time on developping some components which are considered standard in web UIs. Building a tree grid is an example. A tree grid can be useful to represent data in a hierarchical fashion. In this tutorial, we are going to build a treegrid using GXT.
Requirements:
– Eclipse with GWT plugin
– GXT library (Free for personal use or for open source projects)
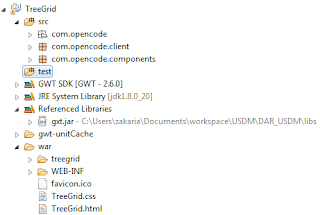
The first thing we need to do is to create a google web application project. Go to File -> New -> Other -> Google and click on Web application project. The project has the following structure:
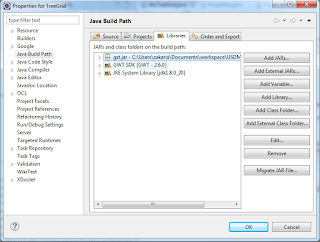
Once the project is created, we need to add GXT to referenced libraries and also to GWT module configuration file. Right click on the project, and then go to build path -> configure build path. Click on “Add External JARs” and add the Jar of GXT.
The GWT module confiugration describes the libraries that will be used in the project, the entry point( which can be translated as Welcome page), and where the translatable code lies.
Now, we are going to create our widget using the following components:
– TreeGrid_disqus: the actual treegrid widget
– ColumnConfig: object used for configuring columns
– TreeStore: object that serves as data model for the widget
– PropertyAccess: interface that links the object data to the data model. The methods need to have the same name as the object T properties.
We are going to create a widget called MyTreeGrid that represents the data of an object named “Concept”.
public class Concept {

private String conceptName;
private String conceptType;
private String conceptOwner;

public Concept(String conceptName, String conceptType, String conceptOwner){
this.conceptName = conceptName;
this.conceptType = conceptType;
this.conceptOwner = conceptOwner;
}
/**
* @return the conceptName
*/
public String getConceptName() {
return conceptName;
}
/**
* @param conceptName the conceptName to set
*/
public void setConceptName(String conceptName) {
this.conceptName = conceptName;
}
/**
* @return the conceptType
*/
public String getConceptType() {
return conceptType;
}
/**
* @param conceptType the conceptType to set
*/
public void setConceptType(String conceptType) {
this.conceptType = conceptType;
}
/**
* @return the conceptOwner
*/
public String getConceptOwner() {
return conceptOwner;
}
/**
* @param conceptOwner the conceptOwner to set
*/
public void setConceptOwner(String conceptOwner) {
this.conceptOwner = conceptOwner;
}

}
We can use the same object to hold data for the second level of the hierarchy, but for clarity sake, we are going to use an object that extends “Concept”.
public class ConceptMetaInformation extends Concept{
}
public ConceptMetaInformation(String metaType, String location){
super(metaType, location, "");

}

}
Next, we need to create our PropertyAccess interface that will serve as a glue between the object and the view:
public interface Properties extends PropertyAccess{

ValueProvider conceptName();

ValueProvider conceptType();

ValueProvider conceptOwner();

}
Note: methods need to have the same name as object properties.
Finally, we can create our widget:
public class MyTreeGrid implements IsWidget {
TreeGrid grid;
ColumnConfig<Concept, String> nameColumn;
ColumnConfig<Concept, String> typeColumn;
ColumnConfig<Concept, String> ownerColumn;
TreeStore store;

//sample data

Object[][] sampleValues = {
{new Concept("Car","Transportation","Z.amine"), new ConceptMetaInformation("Location", "MENA"), new ConceptMetaInformation("Revenues", "150 000$")},
{new Concept("Computer","I.T","H.John"), new ConceptMetaInformation("Location", "Europe"), new ConceptMetaInformation("Revenues", "180 000$")},
{new Concept("Cookies","Food","R.David"), new ConceptMetaInformation("Location", "North America"), new ConceptMetaInformation("Revenues", "200 000$")},
{new Concept("Electric Appliance","Home","T.Short"), new ConceptMetaInformation("Location", "China"), new ConceptMetaInformation("Revenues", "500 000$")},
{new Concept("Air conditioner","Home","F.Jospeh"), new ConceptMetaInformation("Location", "Australia"), new ConceptMetaInformation("Revenues", "120 000$")}
};

@Override
public Widget asWidget() {
Properties properties = GWT.create(Properties.class);
// TODO Auto-generated method stub

store = new TreeStore(new ModelKeyProvider() {
@Override
public String getKey(Concept item) {
if(item instanceof ConceptMetaInformation){
return String.valueOf(item.getConceptName().hashCode()) + item.getConceptType().hashCode();
}else {
return String.valueOf(item.getConceptName().hashCode());
}

}
});

FillStore();

nameColumn = new ColumnConfig<Concept, String> (properties.conceptName(), 180);
typeColumn = new ColumnConfig<Concept, String> (properties.conceptType(), 180);
ownerColumn = new ColumnConfig<Concept, String> (properties.conceptOwner(), 180);

List<ColumnConfig<Concept, ?>> columns = new ArrayList<ColumnConfig<Concept, ?>>();

columns.add(nameColumn);
columns.add(typeColumn);
columns.add(ownerColumn);

ColumnModel columnsModel = new ColumnModel((List<ColumnConfig<Concept, ?>>) columns);

grid = new TreeGrid(store, columnsModel, nameColumn);
grid.setHideHeaders(true);
grid.setBorders(false);

grid.setSelectionModel(new TreeGridSelectionModel());
grid.getSelectionModel().setSelectionMode(SelectionMode.SINGLE);

return grid;
}

private void FillStore(){
for(Object[] conceptInfo: sampleValues){
Concept concept = (Concept) conceptInfo[0];
ConceptMetaInformation location = (ConceptMetaInformation) conceptInfo[1];
ConceptMetaInformation revenues = (ConceptMetaInformation) conceptInfo[2];
store.add(concept);
store.add(concept, location);
store.add(concept, revenues);
}
}
}

We can test our widget in our entry point class:
public class TreeGrid implements EntryPoint {
/**
* This is the entry point method.
*/
public void onModuleLoad() {
MyTreeGrid treegrid = new MyTreeGrid();
RootPanel.get("treegrid").add(treegrid.asWidget());

}
}
Result:

We have an out of the box tree grid that we can use as needed. It can be customized with editors for each cell if needed.